Showing posts with label clinical-dentistry-tips. Show all posts

Tuesday, 28 December 2021

Occupational Hazards and Prevention In Dentistry- An Overview


Occupational Hazards and Prevention In Dentistry- An Overview


Despite numerous technical advances in recent years, many occupational health problems still persist in modern dentistry viz. exposure to infections (including Human Immunodeficiency Virus and viral hepatitis); percutaneous exposure incidents, dental materials, radiation, noise; musculoskeletal disorders; psychological problems and dermatitis; respiratory disorders and eye insults.


DentistFriend is a dental portal for dental students and dentists to share information and knowledge.


INFECTION


Dental practitioners are at the risk of exposure to blood-borne pathogens like the Human Immunodeficiency Virus (HIV), the hepatitis B virus (HBV) and the hepatitis C virus (HCV). In dentistry, sharp injuries occur because of frequent patient movement, small operating field and the variety of sharp instruments used in dental procedure.


PREVENTION


Dental professionals should be aware of individual protective measures (Handwashing, Treatment gloves, overgloves, mouth masks, head caps, protective overgarments) and appropriate sterilization or other high-level disinfection utilities to control infections.


MUSCULOSKELETAL


During dentistry procedure, the dentist's posture is strained which induces stress injury on musculoskeletal system. Hand/wrist complaints, carpal tunnel syndrome, Neck and shoulder complaints, back pain are the most common.


PREVENTION


Dentists should follow the proper operator & patient  positions , take intervals ,keep changing positions to reduce muscle strain & fatigue.


STRESS


Not only physical impairments but also the job related psychological disorders, tension, depression, emotional exhaustion, and depersonalization may affect dentist’s health.


PREVENTION


Stress can never be totally eliminated from dental practice. However, it can be managed by the following-


Improving the work environment at the clinic.
Become less isolated and share problems with fellow practitioners.
Working more sensible hours and taking time each day for a leisurely lunch break.
Take holidays whenever the pressures of practice starts to build.
Learn how to better handle patient's anxiety and hostility.
Adopt  program of physical exercise, such as regular work out at a local health club or by simply walking.


Most importantly, being kinder to yourself and less critical and demanding of your efforts.


RADIATIONS


Ionizing radiations can initiate genetic & carcinogenic changes. Dentists who hold the X-ray film in the patients mouth are prone to radiation dermatitis on hands or in a long run squamous cell carcinoma of the figures.
PREVENTION
Dentists should not hold the x- ray film in the patient’s mouth
Dentists should avoid direct exposure to x-ray beam
Radiation monitoring


LATEX


The etiology of latex sensitivity is based on a reaction to the plant containing allergenic proteins in natural rubber. Referred to as Type I allergy to natural rubber latex protein, allergic reactions can be severe & sometimes fatal.


PREVENTION


Should use non-latex gloves for activities not likely to involve contact with infectious materials.
You can request gloves that do not contain latex but still offer protection against infectious materials.
Avoid oil-based creams or lotions when using latex gloves. They may cause the gloves to break down.
Wash your hands with a mild soap and dry hands completely after using gloves.
Recognize symptoms of latex allergy (rash; hives; flushing; itching;nasal, eye, and sinus irritation; asthma; and shock).


EYE


Majority of dental procedures are accomplished with instruments being passed over or near the patient's face and with aerosols and chemicals frequently in close proximity, and hence both patients and dentists should wear eye protection. The curing lights are also a potential hazard to those who place restorative resins due to phototoxic and photoallergic reactions originating from absorbed radiation.


PREVENTION


A dentist must be vigilant in wearing personal protective equipment (protective glasses, Face shields) to ensure their own personal safety and thus remain healthy and active in their profession.


EAR


Dentists are at risk for noise-induced hearing loss. Even though hearing loss may not be symptomatic, the first complication and the reason for seeking a hearing evaluation may be tinnitus. Noise is always present during the work  due to low-speed handpieces, high-speed turbine handpieces, high-velocity suction, ultrasonic instruments, vibrators, cleaners and other mixing devices, and model trimmers.


PREVENTION


Noise monitoring should be done with noise dosimeters routinely in the dental operatory and necessary measures to reduce noise should be taken. Application of muffles, Handpieces should be well maintained, Compressors should be fitted away from the work place, Sound absorbing material wall ,Resilient floors, Sound proof acoustical ceiling, Simultaneous use of several turbines should be avoided,Dental drills should be kept 35 cm away from ear,Ear plugs and muffs, Audiography test periodically for early detection.


CONCLUSION


There is a need to educate and make the dentists aware of these hazards in dentistry and the methods of their prevention. This can be carried out by carrying various informative programs like seminars, continuing dental education programs and workshops on prevention of occupational hazards in the region. So, it is important for dentists to remain constantly up-to-date about measures on how to deal with newer strategies and dental materials and implicates the need for special medical care for this professional group.


Source : DentistFriend

Saturday, 11 December 2021

How To Have A Bargaining Free Dental Practice?


How To Have A Bargaining Free Dental Practice?

In my last blog you saw how differentiation can help to have a competition free practice. I had also mentioned about adding "Extra Value", in this blogpost let’s see why & how to add that extra value in your practice.


DentistFriend is a best dental portal where in you can search dental jobs, clinical dental courses, second hand dental chair and setup


What does "Extra Value" mean? 


In lay man language, it means giving something extra than what is expected by the patient (not that you pull out an extra tooth. :p) It is about making the patient feel important. It is about "Branding" your practice.


Why do you need to do it ?


Giving that "Extra Value" can help you to retain your patients and there are many other things that it can do!  Again let's start with examples; Did you ever try bargaining at KFC, Dominos or Mac'D? I'm sure never. On the other hand, when it comes to a local restaurant we never hesitate to ask for discount.


Why do people pay happily at THE TALVALKARS GYM but groan, moan and complaint when it comes to paying a personal gym instructor? Why do they happily pay 1000 bucks for a 15 min job at TONY AND GUY and they bargain with their friendly neighborhood barber even for 100 rupees?


We try to bargain at places which are considered as local and the synonym for LOCAL is NON-BRANDED! So now you got to my point! You need to change your practice from Local To Branded, because a BRAND belittles the consumer. We find it inadequate to argue, but want to be a part of it, at all costs. In our mind we feel that the brand somehow glorifies us and that's actually true! That's Human Nature!This is why luxury hotels like Taj, Hyatt invest on creating their brand value? This is why they are they behind improving the user experience & building their image in people's mind.


I am sure you would have arrived to the conclusion yourself! This is the magic of Branding!


Just imagine what can happen if somehow you could convince the patient that he is getting value for his money. Probably the patient will hesitate to bargain, he might appreciate the services he got at your clinic and it is possible that he will never ever think of visiting any other dentist in future.


Just like differentiation helps to build a competition proof practice; branding helps you in bulding a "Bargaining Free" practice. Apart from this it has following advantages:


1. It gives a hidden message describing certain feature or attributes of the practice.


2. It helps to filter patients and you will spend less time on convincing the treatment options.


3. It conveys a message about your services to patients thus creating the image of your practice.


4. Once you successfully establish a brand, people always associate your business with some quality/ value.


5. It also helps you in retaining patients.


Want to know about how to do brand your dental practice? Will share everything in detail in my next blogpost.


Source : DentistFriend

Tuesday, 23 November 2021

Clinical Dentistry Tips: 3 Keys To The Perfect Bisque Trial


Clinical Dentistry Tips: 3 Keys To The Perfect Bisque Trial

On one end of the ladder is leaving the crown high and telling the patient “Settle ho jaega” and on the end is over reducing the prosthetic crown thinking “yeh supraerupt hoke contact mein aa jaega”


Visit the DentistFriend.com dental portal to search jobs in dentistry, or to hire dentist for clinic


Unfortunately both these can have long term deleterious effects on the patients dentition and thus we clinicians should refrain from such erroneous practice.


As ethical clinicians, it is imperative that we do not introduce any interference in the patient’s mouth when crowning a tooth and this makes adjusting the occlusion at the bisque trial phase one of the most critical steps in fixed prosthodontics.


Occlusion at bisque trial should be adjusted in two separate steps:


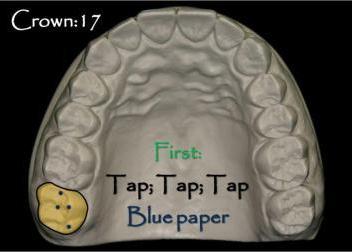
1. Static Occlusion: Where the bite is adjusted in Maximum Intercuspation with POINT contacts on functional cusp tips, mesial/distal marginal ridge and/or central fossa only. 

This should ideally be done with 40 micron Blue colour articulating paper.


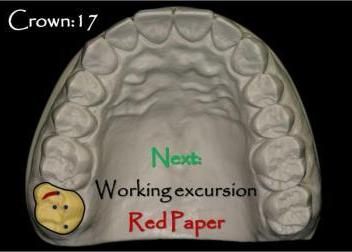
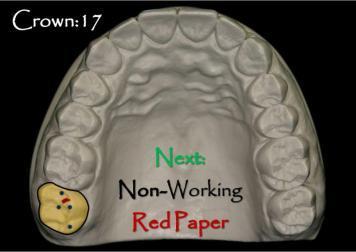
2. Dynamic occlusion: Where excursive contacts are checked (in working side excursion as well as non-working side excursion) and any LINE markings are eliminated completely. It is important to remember that posterior teeth should contact only during Maximum Intercuspation and should be completely disoccluded in every excursive movement.

This should ideally be done with 40 micron Red colour articulating paper


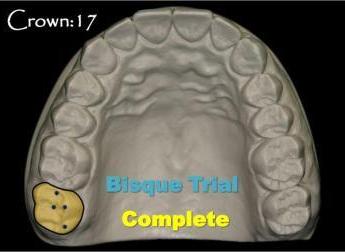
Let’s see how to go about doing a Bisque trial for tooth number 17 diagrammatically.


 First static occlusion is adjusted to achieve 4 points of contact in MIP using blue paper.


Next with red paper working excursion is checked. As depicted a line is seen on the buccal cusp. This line is a working side interference and thus should be completely eliminated.


 Following this the non working excursion is checked and any red line marking is eliminated.


This concludes the bisque trial and the crown is now ready for glazing.


 ”Dots at the Back and Lines in the Front” is the key to achieving an interference free occlusion.


Source : DentistFriend

Wednesday, 17 November 2021

Dental Photography: Are You In Focus?


Dental Photography: Are You In Focus?

Despite having innumerable hours of experience with shooting I have met many dentists who pursue dental photography in the AUTO mode.

I have nothing against the use of AUTO mode but I feel there is a HUGE need for the dentists (AND OTHER MEDICAL EXPERTS) to understand that by using the camera in auto mode one fails to realize the true potential of ones DSLR (or other camera) The AUTO mode is nowhere close to what a DSLR camera can really achieve.


How long does it take to become a dentist in India, to know visit our dental portal DentistFriend.com


It’s actually like a monotonous robot who fails to have a mind of his own.NO creativity, No BRAIN, NO Ambition and NO experimentation … what a dull life.

Despite being a boring mode to shoot in the AUTO mode has innumerable drawbacks one of the greatest drawbacks being the loss of freedom to choose the right focus point.


This post shall be helpful to all the beginners in dental / medical photography who want to understand WHY despite innumerable attempts they do not get a sharp image in any particular situation”


It’s invariably important to have a rough idea of the composition of an image in your mind, not a difficult job for a dentist considering we have few options for standard type of photography. (Of course if you would like to be creative Sky is the limit … but that’s not the point for this post)


We now have a set composition and a magnification to shoot at. We know the settings to shoot at.


The Next step is to focus accurately.


In semiprofessional cameras there is a box (actually meant for face recognition) to help you focus on the area of interest.


In AUTO mode this box tends to change place and even before the dentist knows the box shifts to a place which the camera feels is the desired region for focus and the result is a blurred image.


The reason for this is that the camera will focus on the easiest spot as soon as possible and this usually is a well-lit area with high contrast (be it intra oral or extra oral photography) this area need not be the area where the dentist wants to focus.

So is there a way the dentist can change the focus spot? The answer is yes

In semiprofessional cameras too you can switch to manual focus and manual mode of shooting and shift the box to where exactly you would want to focus.

Remember SMALLER the box … greater will be the accuracy of the spot where you would like to focus.

Speaking about DSLR we have a much professional way to solve the issue

Every DSLR has specific focus points (Number of focus points - 9, 11, as many as 100 or more)

A dentist can pre-select the focus point of choice based on the composition of the image in his/ her mind.


For e.g., selecting the top focus point instead of the center focus point might give greater sharpness to the central incisors which are the subject of conversation in the image.


The focus point can be easily selected using the main dial in Canon cameras. The focus point selected turns RED in the optical viewfinder and also on the LCD screen.

The only thing left NOW is to shoot … hey but wait a minute … we have still not finished actual focusing.

It is always a good choice to set magnification first in the camera and set the lens and camera to manual mode and manAnchorual focus.

Before pressing on the shutter release button one has to make sure that the desired spot is accurately in focus in the optical view finder

If it is not in focus at the desired magnification it is ALWAYS recommended to move your own position rather than change rotate the lens for focusing because that will again change the magnification ratio.

In canon cameras once we achieve accurate focusing the camera gives out a small beep and the focus point flashes red again when we HALF CLICK

(Half clicking is a very good habit that needs to be cultivated because this will tell us if we are correctly focusing or not)

I used a Nikon camera and surprisingly Nikon camera did not give out a BEEP in manual mode during half click – I was a bit uncomfortable with that.

Lastly we need to understand that Focus point is the center of an imaginary sphere (of focused area) Maximum sharpness is in the center and focus reduces as we come towards the periphery.

Hence we should always focus in a spot in between the desired area of depth of field

E.g If we want the entire upper arch in focus it is a good idea to focus on Canines rather than the incisors to avoid wastage of the sharpness in depth of field


Source : DentistFriend

Why Do Some People Need Braces Even When Their Teeth Look Straight?

When people think about braces, they usually imagine correcting visibly crooked or crowded teeth. However, many patients are surprised when ...